- Your cart is empty
- Continue Shopping


Doppler Ultrasound: 9 Secrets To The Perfect Image
- blog
- Posted on
-
 by
Michelle Macauley
by
Michelle Macauley - 0 comments
Understanding Doppler Ultrasound can feel like scaling Mount Everest, especially when you’re just beginning your ultrasound journey. Let’s demystify Doppler! Here’s 9 secrets to the perfect image from a seasoned Sonographer.
Doppler angle, box steering, sample volume size, direction of flow, color gain, PRF, Nyquist limit, spectral Doppler, positive and negative Doppler shifts, angle correct. These are just a handful of the terms that confront us when we are first learning Doppler. Doppler tends to be one of the most complicated subjects to wrap our brains around in ultrasound, but it doesn’t have to be! Let’s explore the secrets behind obtaining the perfect Doppler image.
But first, a few key terms to understand. What exactly is Doppler? Doppler is a set of controls on an ultrasound machine that allows us to look for the presence or absence of blood flow and define the characteristics of that flow. It’s based on the Doppler effect, which according to the Oxford Dictionary is “an increase or decrease in the frequency of sound, light, or other waves as the source and observer more toward or away from each other.” Doppler involves comparing a difference, or shift in frequency.
A sound wave is sent out into the tissue (the transmitted frequency) and encounters a moving object or objects (the red blood cells), and then is reflected back to the transducer (the received frequency). The frequency that is reflected back to the transducer is dependent upon which direction the object was moving. The Ultrasound machine measures the shift in frequency, or difference between these two frequencies (called a Doppler shift) to determine the direction of motion and speed of the red blood cells.
The difference in frequency between the outgoing (transmitted) and incoming (received) frequencies can be either positive or negative. If the object was moving towards the transducer, the frequency that is reflecting back to the transducer will be higher than the original frequency that was sent out, resulting in a positive Doppler shift. If the object was moving away from the transducer, the frequency that is reflecting back to the transducer will be lower than the original frequency that was sent out, resulting in a negative Doppler shift.
When there’s a large difference between the transmitted and received frequencies (a large Doppler shift), this indicates that the red blood cells were traveling at a high velocity. When there’s a small difference between these frequencies (a small Doppler shift), this demonstrates that the red blood cells were traveling at a low velocity.
There’s 3 types of Doppler utilized in Ultrasound imaging: Power Doppler, Color Doppler and Spectral Doppler. Power Doppler detects the presence or absence of blood flow by measuring the strength of the Doppler signal returning to the transducer instead of a shift in frequency. Color Doppler measures the direction of blood flow and a range of velocities by assigning a color to different speeds and directions of flow. Spectral Doppler measures the velocity and direction of blood flow within a tiny window and displays it as a waveform tracing, demonstrating the characteristics of the flow within that specific region. Each vessel of the body has a characteristic waveform pattern of flow. A deviation from this pattern signals either disease or improper machine settings.
A positive Doppler shift on an Ultrasound image represents blood flow moving towards the transducer, visualized as the color assigned to the top of the color Doppler map. It’s also displayed as flow that’s above the baseline on a spectral Doppler waveform tracing (as long as the invert key is not on when spectral Doppler is being used- more on that later). A negative Doppler shift is represented by the color on the bottom of the Color Doppler map and it is conveying that the blood flow is moving away from the transducer. As long as invert is not on, a negative Doppler shift is displayed below the baseline on a spectral Doppler waveform.
Now that we know what Doppler is, let’s discover how to utilize it…
Secret 1: Garbage In, Garbage Out
How your image begins will have a direct effect on your final image. Before turning on Color, Power or Spectral Doppler, the most important factor is optimizing your grayscale image. If your grayscale image is poor, then your Doppler information will be built upon a shaky foundation. Set your foundation first, then build the rest of your house. Use the following list to make your grayscale image shine:
- AREA OF INTEREST (AOI): before optimizing any grayscale Ultrasound image, the most important step is to determine what your Area of interest is. What is your Ultrasound image focusing on? What information are you trying to convey with that image? The area of interest is the highlight of your image, so it’s crucial to know what it is. Many times, when using Doppler, the AOI will be a vessel; other times, such as when evaluating the overall vascularity pattern of an organ, the AOI will be the organ itself.
- DEPTH: the first control to reach for is the depth. Adjust the depth so that the AOI is the star of the show. The AOI or vessel should be located in the mid to far field of your image, taking care to ensure that the posterior, or bottom portion of the vessel is not cut off. If the depth is adjusted too deeply, then the AOI will be crammed into the near field of the image and will be too small tow adequately evaluate.
- FREQUENCY: next adjust the Frequency control so that it remains at the highest level that allows penetration down to the AOI (area of interest, which is your blood vessel). Using the frequency control is a trade off between penetration and image quality. The higher the frequency, the higher the image quality, but the lower the ability to penetrate to deeper depths in the tissue. The lower the frequency, the greater the ability to penetrate, but the grainier the image quality will be.
- FOCAL ZONE: if using a solitary focal zone (appropriate with most types of Ultrasound) the focus should be placed at or just below the AOI (blood vessel). If using multiple foci (such as in Breast Ultrasound), the lowest foci should be placed at or just below the level of the vessel or structure.
- TGC: the natural inclination is to reach for the Gain control first when optimizing the brightness of an Ultrasound image, but adjusting TGC before Gain is the secret sauce. Begin with TGC and the rest will fall into place. The TGC should be decreased at the level of the blood vessel, so that the interior of the vessel is echo free. An exception to this would be if there’s visible plaque/vessel narrowing. The near and far field TGC (anterior and posterior to the vessel) should be adjusted bright enough so that the tissues look like tissue. You should be able to clearly delineate which type of tissue it is (an organ, muscle, fat, etc.). If the area of interest is an organ, then the TGC should be adjusted so that the organ maintains its normal echogenicity.
- GAIN: it’s finally time to adjust the Gain, to ensure the image is bright enough to clearly visualize the tissues, but not so bright that it creates echoes in the vessel. It’s common to reach for the Gain control first, but TGC is a much more important control which should always be adjusted before the Gain control. It’s essential to when using gain to ensure that the image is not saturated with too much brightness, or be so dark that you cannot distinguish between different tissue types.
- OUTPUT POWER: the last brightness control you should adjust is the output power. The output power affects the strength of the pulse that’s sent into the patient, so it should always be used at the lowest level that produces a diagnostic image. If it’s set too low, the image will be too dark, despite gain and TGC adjustments. If it’s set too high, then the risk to the patient will outweigh the benefit, and a better option would be to use gain and TGC to reach the desired level of brightness.
- DYNAMIC RANGE: the last control to adjust is the dynamic range. When focusing on a blood vessel, adjust so that the image has slightly more contrast (less grays and more blacks and whites). When adjusting dynamic range to focus on an organ, the dynamic range should be adjusted so that it has more grays, with less contrast and fewer black and white colors.
Once your grayscale image is looking top notch, next turn on Color or Power Doppler. Optimize the color or Power Doppler settings (see checklist in step 8 below) completely before moving onto the next step. Your image now has a strong foundation (optimized grayscale) and your house is framed (optimized Color or Power Doppler settings), now it’s time to add the finishing touches. Turn on Spectral Doppler and optimize the settings (see checklist in step 9 below). Once your spectral Doppler settings are adjusted, you now have a fully optimized image, from foundation to finishing touches.
Secret 2: It’s All About the Box
When Power or Color Doppler is turned on, a Doppler box pops up onto the screen. The Doppler box is the area that displays the Doppler signals (blood flow information).
Box Size
One of the keys to obtaining a strong Doppler signal with color or power Doppler is by optimizing the size of the Doppler box. When the box is too large, sensitivity to detect blood flow is low, and small blood vessels or vessels that have flow moving slowly can be missed. When the box is too small, then the Doppler box is only picking up signals from inside that small window, which means that important blood flow information that’s happening outside the box can be missed.
The key to box size is to ensure that it completely encompasses the region that you need blood flow information from without affecting Doppler sensitivity. When evaluating a large vessel, such as the carotid, adjust the size of the box to pick up information from only a portion of the vessel, the specific section that you are currently interrogating; if the entire vessel was included, or too large of a segment of the vessel, then Doppler sensitivity will be poor. When evaluating a tiny vessel, adjust the size of the box to completely encompass the entire vessel and a small rim of adjacent tissue.
Box Position
Doppler box position is equally important. For this example, let’s look at a mass. The box should be positioned to entirely encompass the mass plus a small rim of adjacent tissue, with the mass centered in the box. Box position and size go hand in hand. If the box is too large, including too much surrounding tissue in addition to the mass, then Doppler sensitivity will be low, and flow within the mass can be misrepresented. Such as displaying no flow when there’s actually blood flow present. If the box is too small, then flow information from portions of the mass or adjacent tissue can be lost.
If the box is not centered over the mass, then blood flow information from one or more sides of the mass is lost. When evaluating a mass, it’s equally important to view flow information to the mass, as well as the tissues immediately surrounding the mass so that feeding vessels (vessels entering from outside the mass to supply flow to the mass) can be visualized when present.
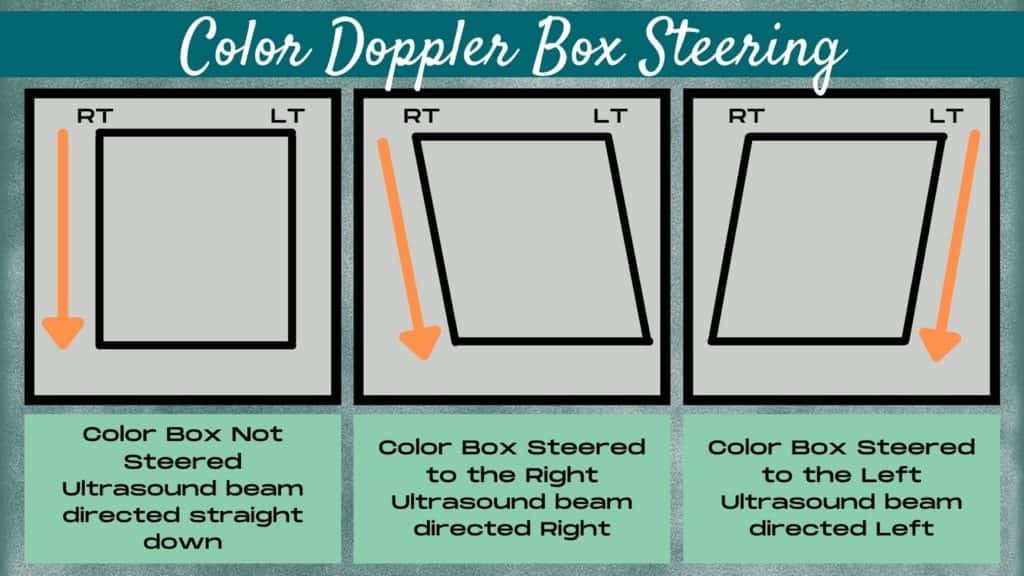
Box Steering
To steer or not to steer, that is the question. And what in the world is box steering? Steering means that the angle of the box is shifted (which shifts the angle that the Ultrasound beam is directed). In Doppler, angle is everything. At certain angles (90 degrees), no Doppler shift occurs and flow information cannot be obtained. If the vessel and the Doppler box are perpendicular to each other, then no blood flow information will be displayed because there’s no Doppler shift occurring.
It’s crucial to steer the box to match the angle of the ultrasound beam to the vessel (if there’s a mismatch between these two, then the Doppler information will be inaccurate). Steering the box can also provide an artificially created angle, when the vessel and the ultrasound beam are perpendicular to each other (so that there’s an angle to create a Doppler shift and flow information can be obtained).
How Should You Steer the Box? Let’s Talk Box Steering…
There’s 3 positions for a Color Doppler box: not steered, steered right or steered left.
Flow Perpendicular to the Transducer
When the color Doppler box and the vessel both lie perpendicular to the Ultrasound beam, at 90 degrees, no Doppler shift occurs. Consider the scenario below.
In the images above, no Doppler shift occurs because both the vessel and the Doppler box lie at a 90 degree angle to the Ultrasound beam, which is directed straight down since the box is unsteered. The vessel will either be completely black inside, or display small blips of color. To create an angle in this scenario, heel-toe the transducer to create an angle with the vessel, steer the Doppler box to create an angle, or, even better, heel-toe the transducer and steer the box angle to match the new vessel angle to obtain the most accurate Doppler shift information.
Matching the Lie (Angle) of the Vessel to the Angle of the Box
When steering a color Doppler box, it crucial to match the angle of the box with the lie, or angle of the vessel. Consider the following examples…
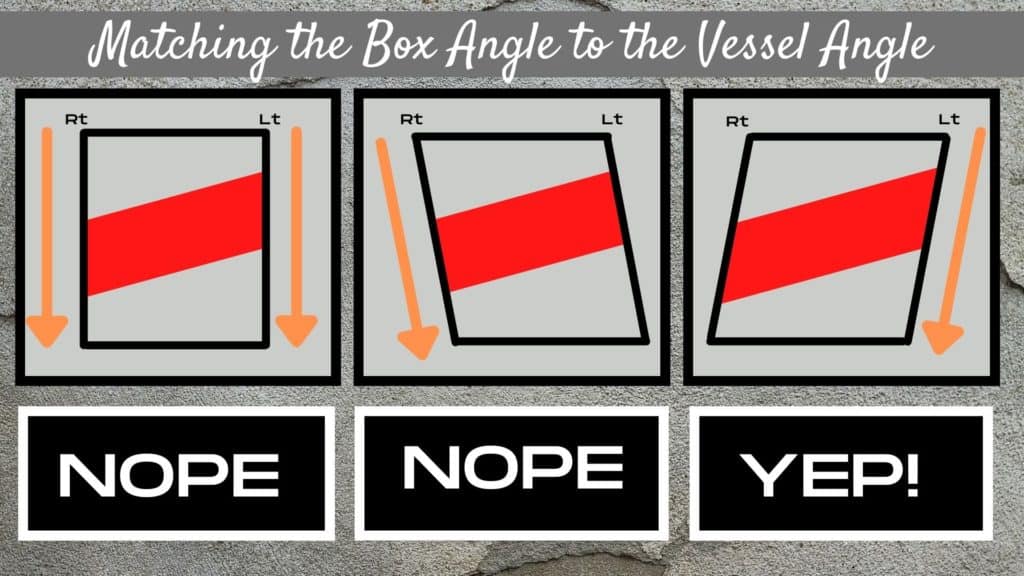
In the first example above, in the image to the left, the vessel is slanted but the box is unsteered and the Ultrasound beam is directed straight down. In this scenario, the angle between the vessel and the Ultrasound beam is increased, resulting in a weaker Doppler shift, less accurate Doppler information and decreased Doppler sensitivity. In the middle example, the vessel is angled one direction, but the box is steered in the opposite direction. This will result in the direction of flow information being displayed as flow moving in the opposite direction as it’s actually traveling. In the last example to the right, the direction that the color Doppler box is steered matches the lie, or angle of the vessel. This will provide the most accurate Doppler information, including direction of flow, velocity range and Doppler sensitivity.
When Should You Steer the Box? Depends…
There’s certain scenarios where the color Doppler box must be steered, and other situations where steering is not helpful, and it’s best to leave it unsteered. Let’s explore each of these situations.

Evaluating a Blood Vessel:
In the first example, in the image to the left above, the color Doppler box should always be steered to match the lie of the vessel when the vessel itself is the area of interest. Steering to match the vessel angle will provide the best Doppler sensitivity and Doppler information, such as velocity range and direction of flow will be accurate.
Evaluating a Mass:
In the middle example above the area of interest is a mass. The purpose of evaluating a mass with color Doppler is to determine whether or not there’s internal flow (flow inside the mass) and the pattern of the flow (i.e. flow towards the center of the mass vs the periphery of the mass, and the amount of flow (hypovascularity vs hypervascularity). These characteristics can be evaluated without the Doppler box being steered as direction of flow and flow velocity are not criteria being evaluated in a mass
Using Power Doppler
In the image to the right above, the Doppler box should be sometimes be steered when using power Doppler. Use the list below as a guide:
- Steer the box when using directional power Doppler
- Steer the box when evaluating a vessel with power Doppler, as this will give you the maximum amount of Doppler sensitivity, allowing the vessel to be filled in with signal
- Do not steer the box when evaluating a mass as the goal is evaluating for the presence of internal vascularity and the amount and pattern of the flow rather than the flow velocity and direction of flow.
- Do not steer the box when evaluating the overall vascularity of an organ, such as an ovary or a kidney. Since the structure as a whole is being evaluated, the box should remain unsteered so that the flow information is equal throughout the entire organ. If the box is steered when evaluating an organ as a whole, then part of the organ will lie outside of the FOV of the color box.
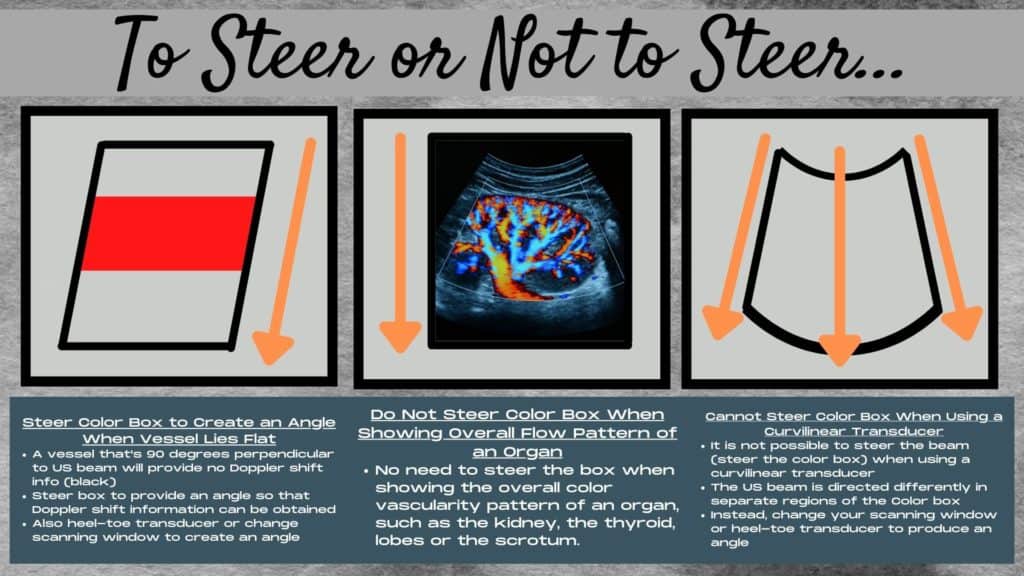
When a Vessel Lies Flat
In the image to the left above, the vessel lies horizontally on the Ultrasound, perpendicular to the Ultrasound beam. In this scenario, the transducer should be heel-toed in order to create a vessel angle, and the color Doppler box should be steered to match the new vessel angle. If the vessel remains at a 90 degree angle to the Ultrasound beam and the box is unsteered, no Doppler shift will occur.
Evaluating the Overall Flow Pattern of an Organ
In the middle image above, a curvilinear transducer is used to evaluate the kidney. In this scenario, it is not possible to manually steer the box. When the overall flow pattern of an organ (such as an ovary or a testicle) is being evaluated with a linear transducer, the box should remain unsteered, with the Ultrasound beam directed straight down. This will ensure that each segment of the organ is within the color box, and the color signal is equivalent throughout the box.
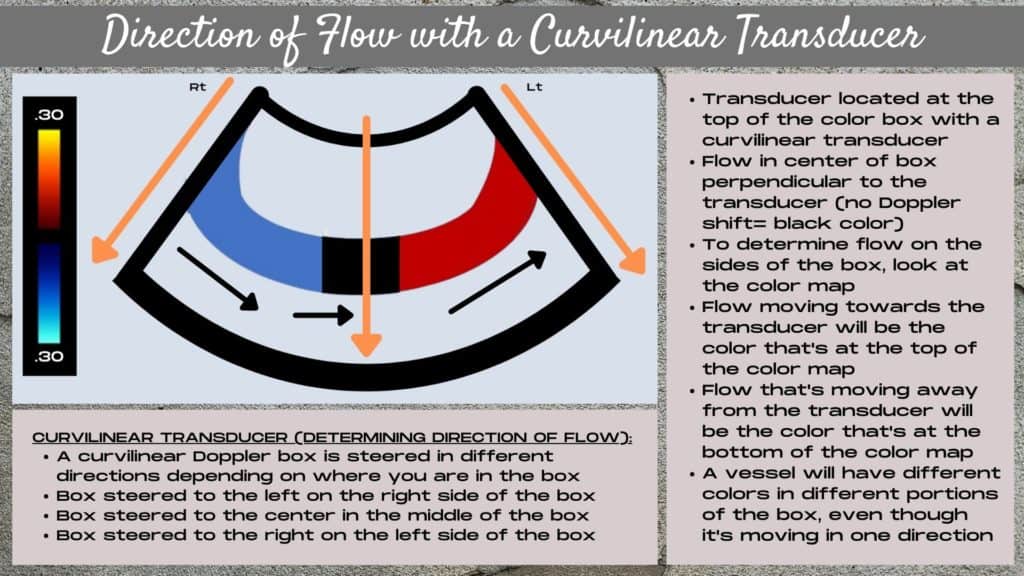
Curvilinear Color Doppler Box
The color Doppler box for a curvilinear transducer is steered in different angles, depending upon which part of the color box you are in. The box is split into 3 sections: in the middle segment of the Doppler box, the Ultrasound beam is steered straight down, and vessels that lie horizontally in the tissue within this zone will appear black on the Ultrasound screen; in the right segment of the curvilinear Doppler box, the Ultrasound beam is steered to the left of the Ultrasound monitor (the beam is directed towards the patient’s right); in the left segment of the curvilinear box, the Ultrasound beam is steered to the right of the Ultrasound monitor (the beam is directed towards the patient’s left). The Doppler box cannot be manually steered with a curvilinear transducer.
Secret 3: Not Understanding Direction of Flow
Understanding direction of flow when using Doppler is challenging to wrap one’s brain around, especially at first. A positive Doppler shift signals flow towards the transducer, and a negative Doppler shift represent flow moving away from the transducer, but what does that look like on an Ultrasound image? And where is the transducer?
Where’s the Transducer?
You can’t determine direction of flow without knowing where the transducer is. The location of the transducer will vary, depending on the type of transducer used and whether or not the Doppler box is steered.
Linear Transducer
Let’s start with a linear transducer. When the color box is not steered the linear transducer is located at the top of the box, with the Doppler beam angling in a straight line down through the tissue. In this example, the vessel lies horizontally, perpendicular to the transducer (Ultrasound beam). Since the vessel and the beam are at a 90 degree angle to one another (perpendicular), there is no Doppler shift and thus no vascularity is displayed within the vessel.
If a heel-toe transducer technique is used (where either the top or the bottom portion of the transducer is pressed harder into the tissue) an artificial vessel angle can be created despite the box being unsteered. This will allow some flow within the vessel, though not optimal flow because the Doppler box is not steered. After heel-toeing the transducer, steer the box to match the new lie of the vessel for the most accurate Doppler signal.
Next, how can you determine where the transducer is when the Doppler box is steered? To answer this question, you need to draw two dotted lines, one on either end of your steered Doppler box. The dotted line that falls outside of the Doppler box represents the side of the box that your transducer is located.
Curvilinear Transducer
With a curvilinear transducer, the box cannot be manually steered, and the transducer is always located at the top of the box. The curvilinear transducer box is steered in different directions, dependent upon which portion of the box you are in. It is split into 3 sections (not steered, steered to the right and steered to the left). Flow information for the AOI (area of interest) depends on where you are within the Doppler box.
If the AOI is in the middle, it’s in the non-steered portion of the box. If the AOI is on the right side of the box then then it’s in the portion of the box where the Ultrasound beam is steered towards the left, and the beam is being directed from left to right. If the AOI is on the left side of the box, then it’s in the portion of the box where the ultrasound beam is steered to the right, and the beam is being directed from right to left.
The Doppler box cannot be manually steered when using a curvilinear transducer. To obtain an angle when scanning with a curvilinear transducer, heel-toe the transducer. This involves pressing harder on one side of the transducer (either the heel or the toe) in order to angle the vessel on the screen.
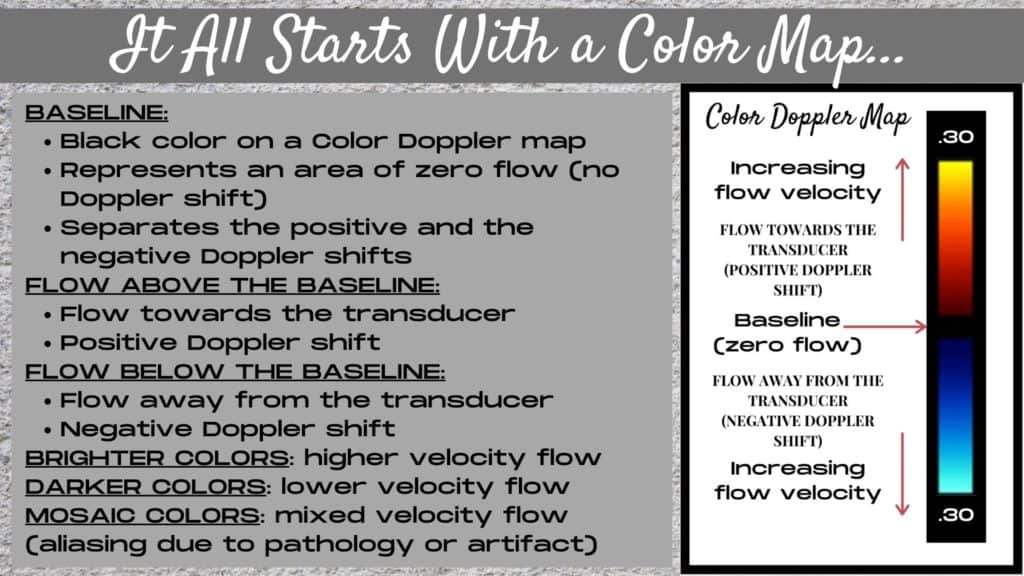
The Color Doppler Map Explained
Now that you know where the transducer is located, let’s tie that information to a color Doppler map. A color Doppler map is a bar that appears on the side of an Ultrasound image when color Doppler is turned on. The color bar has 3 sections: the top portion of the color map, both bottom section of the color map and a black line in the middle.
Colors on a Color Doppler Map
The black line is the baseline, an area of zero Doppler flow information that separates the positive Doppler shifts and the negative Doppler shifts. The positive Doppler shift information is always always always located at the top of the color Doppler map (even when the colors are inverted), and the negative Doppler shift information is always located at the bottom of the color Doppler map.
Whatever color is assigned to the top of the map (typically red, but it can be changed to any color) means that the blood flow is moving towards the transducer (remember where the transducer is located- this was what we covered under secret # 2), which is a positive Doppler shift. The color that is displayed on the bottom of the map represents blood flow that’s traveling away from the transducer, which is a negative Doppler shift.
Brighter colors on the color Doppler map represent higher velocity flow; darker colors convey flow that’s moving slower. Black represents no flow, and that no Doppler shift is occurring. Mosaic colors (a rainbow of many colors together) demonstrates aliasing (either the flow is moving in multiple directions and speeds, or the machine settings are off, producing artifactual aliasing).
Velocity Scale on a Color Doppler Map
Colors are assigned on the color Doppler map to signify different velocities. There is a number on each end of the color Doppler map which represents the velocity range (range of velocities that are displayed on the color map). The further away from the black baseline (in either direction, positive or negative), the higher the velocity of the blood flow. The range of displayed velocities on a color Doppler map can be changed with the PRF/Scale control on an Ultrasound machine.
Determining Direction of Blood Flow
Let’s explore 3 scenarios: flow towards the transducer when using a linear transducer, flow away from the transducer with a linear transducer, and flow direction when using a curvilinear transducer.
Flow Towards the Transducer (Linear Transducer)
Determine the location of the transducer (instructions above). Next, create a Doppler angle (heel-toe the transducer, and/or steer the color Doppler box). Look at the information on the color map. Which color is on the top of the color map? The color that’s on the top of the color Doppler box represents flow moving towards the transducer and a positive Doppler shift. Look at the color of the vessel. If it is the same color as the color on the top of the color map, then the flow is moving towards the transducer.
Flow Away From the Transducer (Linear Transducer)
Determine the location of the transducer (instructions above). Next, create a Doppler angle (heel-toe the transducer, and/or steer the color Doppler box). Look at the information on the color map. Which color is on the bottom of the color map? The color that’s on the bottom of the color Doppler box represents flow moving away from the transducer and a negative Doppler shift. Look at the color of the vessel. If it is the same color as the color on the bottom of the color map, then the flow is moving away from the transducer.
Determining Direction of Flow with a Curvilinear Transducer
With a curvilinear transducer, the transducer is located at the top of the color box. The box is split into 3 segments, and each section of the box is steered in a different manner. The Ultrasound beam is steered straight down in the center of the box, directed to the right on the left side of the box and steered to the left on the right side of the box. Flow in the center of the box is perpendicular to the transducer, so unless a vessel angle is created within the center of the box, no Doppler shift will occur in this region and the vessel will be black in color within this segment of the box.
Flow moving upwards, towards the transducer, will be the color that’s at the top of the color map and will represent flow moving towards the transducer. Flow that’s moving downwards, away from the transducer will be the color that’s at the bottom of the color Doppler map. A vessel will display different colors when it’s in different portions of the box, even though the flow is moving in one direction within the body.
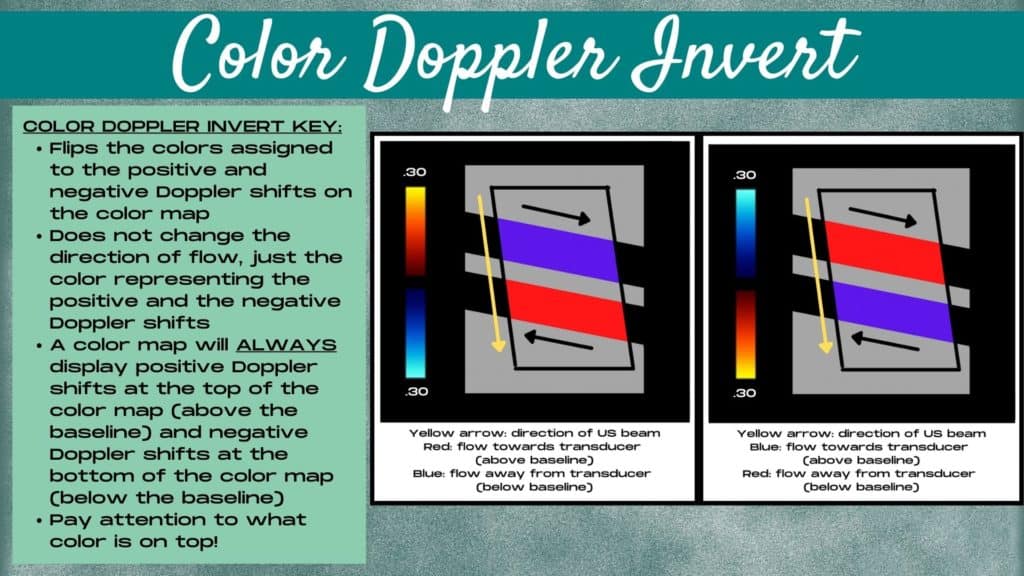
How Color Invert Affects Direction of Flow
There’s a control on an Ultrasound machine called “invert” which can change the displayed information. When invert is turned on when using color Doppler, it flips the colors assigned to the positive and negative Doppler shifts on the color map. It does not change the direction of flow, only the color assigned to each direction of flow. A color map will always display positive Doppler shifts at the top of the color map and negative Doppler shifts at the bottom of the map, regardless of whether the invert key is being used.
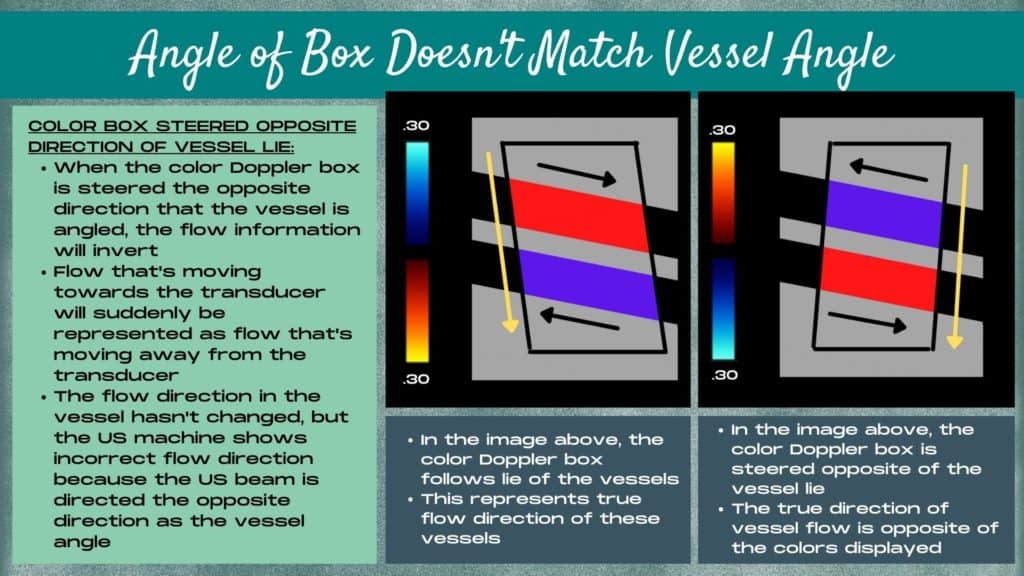
How Vessel Lie & a Doppler Box Steering Mismatch Affects Direction of Flow
When the angle of the Doppler box is steered to an angle that’s opposite the angle of the lie of the vessel, then Doppler direction of flow information will be opposite the actual direction that the flow is traveling.
Spectral Doppler Invert and Direction of Flow
With spectral Doppler, flow above the baseline is meant to represent flow towards the transducer (positive Doppler shift), and flow below the baseline is meant to represent flow away from the transducer (negative Doppler shift). However, using the invert key flips the velocity scale on the side of the spectral waveform tracing to display negative Doppler shifts above the baseline and positive Doppler shifts below the baseline. This is distinctly different than color Doppler, in which the positive vs the negative Doppler shift information never changes position, only color.
When using spectral Doppler, to determine which side of the baseline is displaying positive vs negative Doppler shifts, look at the velocity scale numbers next to the waveform tracing. Negative numbers represent negative Doppler shifts and positive numbers represent positive Doppler shifts. If negative numbers are above the baseline on the velocity scale when using spectral Doppler, then flow above the baseline represents flow away from the transducer. If positive numbers are above the baseline on the velocity scale, then above the baseline represents flow towards the transducer.
Secret 4: It’s All About the Angle
One of the most important factors when using Doppler (except power Doppler) is angle. As the Doppler angle increases, the Doppler shift decreases, which causes Doppler information to be overestimated or underestimated. There’s 3 methods of creating an angle when using Doppler: steering the color Doppler box, creating an angle with a vessel by heel-toeing the transducer, or by angle correcting the angle when using spectral Doppler.
A color box can be un-steered (straight), or steered to the left or to the right. This is the simplest form of creating a Doppler angle, but it can only be done with a linear transducer (curvilinear color Doppler boxes do not have the ability to be steered). In cases where the color Doppler box can not be steered to create an angle, a heel-toe transducer technique can be used. This involves either putting pressure on the top or the bottom on the transducer in order to angle the vessel in a manner in which an angle is created.
The 3rd method of creating an angle is with the angle bar in spectral Doppler. The machine allows the angle bar to be set at any angle. Zero degrees is the most accurate angle, but hard to achieve; 60 degrees is the angle that is most reproducible and is used for most application of Doppler; angles above 60 degrees are inaccurate, resulting in a minimal Doppler shift and erroneous flow data.
Location of the Ultrasound Beam with Color Doppler
The angle of the Ultrasound beam when using color Doppler is dependent upon the color Doppler box. With a linear transducer and an unsteered box, the Ultrasound beam is being directed straight down. With a box steered to the right, the Ultrasound beam is steered towards the right. With a Doppler box steered to the left, the Ultrasound beam is steered towards the left.
When using a curvilinear transducer, the Ultrasound beam is being steered in 3 directions- straight down, to the left and to the right, dependent upon which segment of the box the area of interest is in.
Parts of a Spectral Doppler Line
When spectral Doppler is turned on, a line, gate and angle populate onto the Ultrasound screen. The line represents the angle that the Ultrasound beam is being directed, the gate is the window from which the spectral Doppler information is collected, and the angle represents the angle from which the spectral Doppler information is obtained
Why Angle is Important
Angles are crucial when using Doppler because:
- Improper angles can provide inaccurate flow velocity information (over or underestimate speed of blood flow)
- Improper angles may result in no flow information (zero Doppler shift occurs at 90 degrees)
- Improper angles can display inaccurate direction of flow data (when the vessel angle and color Doppler box angle do not match, it displays flow traveling the opposite direction than it’s actually traveling).
Optimal Doppler Angles to Use
- An angle of zero degrees is ideal, but difficult to obtain when using Doppler
- Angles from 0-60 degrees provide accurate Doppler shift information
- Angles above 60 degrees (61-89 degrees) provide errors in velocity (over or underestimate flow velocities)
- The larger the angle, the greater the error
- An angle of 90 degrees will provide no flow information (no Doppler shift occurs at a 90 degree angle)
Secret 5: The Importance of Doppler Gain
Doppler gain is a control which increases or decreases the amount of Doppler signals displayed within the Doppler box by amplifying or reducing the Doppler shift signals. It’s accessed by twisting the Color Doppler knob left or right.
Before we explore how this control is optimized, let’s discuss noise. Doppler noise that is.
Doppler Noise
Noise is artifactual Doppler echoes that do not represent actual flow. Noise can be caused by motion or by the Doppler gain level being set too high. Noise appears as pixelated dots of color (sometimes grouped together to form lines or shapes) within the Doppler box.
Doppler Bleed
When the color Doppler gain is set too high, artifactual echoes (noise) are displayed in areas where there should be no color signal. This can present not only as pixelated dots of color within the Doppler box, but also as color spilling outside the walls of vessels. When the Doppler signal extends beyond the walls of a vessel, this is known as color bleed. Color bleed can obscure vessel walls and make a Doppler image appear sloppy. Reducing the Doppler gain level will eliminate color bleed.
Setting the Proper Doppler Gain Level
Turn on color or power Doppler by pressing the correct Ultrasound control. Twist the color Doppler gain knob until noise is displayed in the color or power Doppler box. Slowly turn down the color Doppler gain knob by twisting it the opposite direction until the noise in the Doppler box just disappears. This is the optimal color or power Doppler gain setting (sensitive enough to pick up slow flow or tiny vessels, but low enough to eliminate noise artifact.
Note that the color Doppler gain knob controls the gain for both power and color Doppler on many Ultrasound machines. Power Doppler is usually just an on/off button, with the gain linked to the color Doppler control.
Secret 6: Utilizing the PRF Control
PRF, Nyquist Limit, Aliasing. It’s enough to make your brain hurt. But these concepts are actually quite simple once understood. Let’s dive in…
PRF/Scale Control
Ultrasound pulses are transmitted at a certain frequency, known as the PRF. The PRF, or pulse repetition frequency is the number of pulses of sound that occur in one second. On an Ultrasound machine, there’s a control known as the PRF, or the Scale control. The PRF control increases or decreases the range of velocities that the Ultrasound machine can detect. This changes the range of velocities displayed on the top and bottom of the color Doppler map and/or changes the scale on the side of the Doppler waveform tracing. If the range of displayed velocities is set to low, then aliasing occurs. If the range of velocities displayed is set too high, then a vessel will fail to fill with Doppler signals when using color Doppler, or the waveform tracing will be tiny when using spectral Doppler.
Nyquist Limit
Doppler has a limit. Past this limit, the Ultrasound machine can no longer measure the velocity of the flow because it is too high. This limit is called the Nyquist limit. The Nyquist limit is the maximum limit of the Doppler shift that can be measured and displayed by the Ultrasound machine. Above the Nyquist limit, aliasing occurs (multiple color signals within an area representing multiple directions and speeds of flow, or improper Ultrasound machine settings. The Nyquist limit is half the PRF (pulse repetition frequency).
Aliasing
Aliasing is flow that is moving in multiple speeds and directions or artifactual aliasing causes by improper settings. It appears as multiple colors in a color Doppler box or as signal wraparound of the waveform tracing on spectral Doppler. Artifactual aliasing occurs when the velocity of the flow has exceeded the Nyquist limit, through the use of improper Doppler angles, or when the PRF or baseline controls on an Ultrasound machine are set incorrectly. True aliasing occurs within a curvature, branching or narrowing of a vessel when flow velocities become turbulent and/or increase in velocity.
Secret 7: Let’s Talk Baseline
When using color Doppler, the baseline is the black line in the middle of the color Doppler map. When using spectral Doppler, the baseline is the horizontal line in the middle of the waveform tracing. The baseline represents an area of zero flow (zero Doppler shift) and separates the positive and the negative Doppler shifts. The baseline can be moved up or down to accommodate higher or lower velocity ranges. Moving the baseline does not change the velocity range or scale itself, rather it changes whether a higher number of positive or negative Doppler shifts are displayed.
In color Doppler this means that it emphasizes either the positive or negative Doppler shifts (either representing the color of the flow on the top of the color map more when the baseline is moved down, or displaying the color of flow on the bottom of the color map more when the baseline is moved up).
In spectral Doppler, the baseline (line) itself can be moved up or down on the waveform tracing. If the baseline is too high when using spectral Doppler, the waveform will wrap around. If the baseline is too low, the waveform can also wrap around, in the other direction.
A waveform pattern above the baseline in spectral Doppler represents flow towards the transducer (positive Doppler shift) and a waveform pattern below the baseline is flow moving away from the transducer (negative Doppler shift). It’s important however to check whether or not the “invert” key has been turned on, especially when using spectral Doppler. Turning invert on while using spectral Doppler flips the positive and the negative Doppler shifts. There’s a velocity scale on the side of the spectral Doppler waveform tracing. It’s crucial to look at the numbers on the side of the scale. Are the numbers positive or negative? This will tell you which side of the baseline represents positive vs negative Doppler shifts.
Feeling lost with some of these Ultrasound controls? Here’s a quick tutorial to help with that: 20 ESSENTIAL ULTRASOUND CONTROLS EVERY SONOGRAPHER SHOULD KNOW AND HOW TO USE THEM
Secret 8: Color & Power Doppler Optimization Checklist
- OPTIMIZED GRAYSCALE IMAGE:
- The grayscale image should be optimized prior to Color or Power Doppler being turned on (garbage in, garbage out)!
- Optimize Frequency, Depth, Focal Zones, Gain, and TGC
- TRANSDUCER PRESSURE:
- OPTIMAL TRANSDUCER PRESSURE: minimal amounts of transducer pressure should be applied to the body when evaluating superficial or tiny blood vessels as the smallest amount of pressure obliterates (collapses) these vessels.
- COLOR/POWER DOPPLER GAIN:
- TOO HIGH: noise in the color box
- TOO LOW: vessel will not fill with color signal; mass will not display true vascularity level
- OPTIMAL DOPPLER GAIN LEVEL: turn up the Doppler gain until noise is displayed within the box; next, turn down the gain just until the noise disappears
- COLOR/POWER DOPPLER BOX SIZE:
- BOX TOO LARGE: the larger the box, the less Doppler sensitivity
- BOX TOO SMALL: important Doppler information can be lost to structures or portions of a mass that are outside the Doppler box
- OPTIMAL BOX SIZE: box should contain AOI and a small rim of surrounding tissue
- COLOR/POWER DOPPLER BOX POSITION:
- BOX NOT CENTERED: important information on the sides of the Doppler box may not be included in the image (lost outside the box)
- OPTIMAL DOPPLER BOX POSITION: area of interest should be centered within the power or color Doppler box
- BOX POSITION WITH A MASS: if the area of interest is a mass, then a small rim of surrounding tissues, on all sides of the mass should be included within the color/power Doppler box
- COLOR BOX STEERING:
- WHEN TO STEER BOX: steer the box when evaluating a vessel, when using directional power Doppler, or when needing to create an angle
- WHEN NOT TO STEER BOX: the box does not need to be steered when evaluating a mass, when looking at the overall flow pattern of an organ, or when using traditional power Doppler (unless a vessel is being evaluated with power Doppler). The color box cannot be manually steered when using a curvilinear transducer. If you need to create an angle when using a curvilinear transducer, heel-toe the transducer
- HEEL-TOE TRANSDUCER:
- WHEN TO HEEL-TOE THE TRANSDUCER: heel-toe the transducer to create a vessel angle
- HOW TO HEEL-TOE THE TRANSDUCER: press harder on either the top or the bottom of the transducer to produce an angle
- COLOR DOPPLER PRF/SCALE CONTROL:
- PRF TOO LOW: aliasing within the vessel
- PRF TOO HIGH: vessel will not fill with color
- PRF & THE GAIN CONTROL: you may need to readjust the color Doppler gain after adjusting the PRF/Scale control
- COLOR DOPPLER BASELINE:
- Adjust higher or lower when you need a stronger positive or negative Doppler shift (emphasizes either flow towards or away from the transducer)
- COLOR/POWER DOPPLER ACCUMULATION:
- WHEN TO USE ACCUMULATION CONTROL: use when trying to get a signal in something with low flow (such as a transabdominal ovary)
- WHAT THE ACCUMULATION CONTROL DOES: accumulation holds the flow signal longer (makes flow less pulsatile) so that you can visualize really slow flow, or flow deep in the body
- COLOR DOPPLER INVERT:
- Use invert when dealing with a tortuous vessel (in order to display a consistent color throughout the study)
- Can also be used to display arteries as red and veins as blue (when live scanning produces the opposite colors)
- DEPTH WHEN USING COLOR DOPPLER:
- DEEPER DEPTHS: the deeper the depth, the weaker the Doppler signal
- SHALLOWER DEPTHS: the shallower the depth, the stronger the Doppler signal
- HOW DEPTH & DOPPLER ARE RELATED: The Doppler signal attenuates with increasing depth
- FREQUENCY WHEN USING COLOR DOPPLER:
- LOW FREQUENCY & COLOR DOPPLER: a low frequency allows for greater penetration, but the color signal will be lower quality (more pixelated)
- HIGH FREQUENCY & COLOR DOPPLER: a high frequency creates a higher quality color signal (less pixelated), but penetration ability is decreased
Secret 9: Spectral Doppler Optimization Checklist
- OPTIMIZED GRAYSCALE IMAGE AND OPTIMIZED COLOR/POWER DOPPLER SETTINGS:
- Prior to turning on Spectral Doppler, both the grayscale image and the color or power Doppler settings should be optimized
- Garbage in, garbage out!
- SAMPLE VOLUME SIZE:
- Keep the sample volume size small (generally 1mm) so that the spectral gate doesn’t pick up flow from adjacent vessels
- SAMPLE VOLUME POSITION:
- Sample volume should be placed into the middle of the vessel, away from vessel walls
- ANGLE CORRECT:
- Always try for a 60 degree angle
- If you cannot obtain a 60 degree angle, try heel-toeing the transducer to obtain one
- If you still cannot obtain a 60 degree angle, use an angle less than 60 degrees (do not ever use above 60 degrees or flow velocity will be inaccurate)
- BASELINE:
- Pay attention to which side of the baseline the positive vs the negative Doppler shifts are located (is invert turned on)?
- Adjust the baseline so that the waveform is not wrapping around and is not touching the top of the waveform tracing area (generally placed lower on the screen)
- PRF/SCALE:
- Adjust the PRF/Scale so that aliasing (waveform wraparound) is eliminated
- Also ensure that the PRF/Scale is not too high, or your waveform will be too small
- Ensure that the waveform fills the waveform area without signal wrap around
- SWEEP SPEED:
- Increase the sweep speed to make the waveform cycles further apart and to display fewer waveform cycles on the waveform tracing (removes extraneous data)
- INVERT:
- Pay attention to which side of the baseline has the positive vs the negative Doppler shift information
- Is your invert key turned on?
- DEPTH WHEN USING SPECTRAL DOPPLER:
- With increasing depth, the sensitivity of the Doppler signal decreases
Conclusion
Doppler shift, PRF, sample volume, box steering- you’ve mastered the lingo and are ready to tackle Doppler. The key takeaways are to perform Doppler in stages- grayscale, color/power Doppler and then spectral Doppler. Remember that angle determines everything in Doppler- angle of the box, angle of the vessel, angle of the ultrasound beam and the angle bar in spectral Doppler. If there’s a mismatch between the AOI (area of interest) and the angle, then flow information will be inaccurate. Once you’ve perfected your grayscale image, and obtained an accurate angle, the last step is optimizing the specific controls. Doppler gain, PRF, baseline, and box size and position optimization will ensure that your Doppler image shines.